Fastlane, CircleCI를 이용하여 React Native DevOps 도입기 (2)
React Native 프로젝트에서 Fastlane을 사용하기 (IOS편)
아래 내용은 Getting Started · React Native 에 따라서 기본 환경을 구성했다는 전제 하에 진행됩니다.
React Native Project 만들기
우선 샘플 프로젝트를 하나 만들도록 한다. 주의할 점은
create-react-native-app로 만들지 말아야 한다는 것이다.crna로 프로젝트를 만들면expo로 동작하는 데 이용하면, 네이티브 프로젝트를 만들고 Native Code를 Testing 하는 것이 불가능하다.
-
아래 명령어로, project를 init한다.
$ react-native init DevOpsForRN # Native Project Initialize
$ cd DevOpsForRN
Fastlane을 Native Project Directory 에서 사용하기
- 아래 서술하는 내용은 공식 문서와 동일하다. IOS Setup - fastlane docs Android Setup - fastlane docs
-
우선 fastlane을 사용하기 위해서는 글로벌로 설치를 해야 한다.
# Using RubyGems
$ sudo gem install fastlane -NV
$ sudo gem install bundler
위 명령어가 실행 불가능 하다면 대안으로 아래 명령어를 실행한다.
Alternatively using Homebrew
$ brew cask install fastlane $ sudo gem install bundler
- 첫 번째로 ios 폴더에 들어가서 초기화를 진행한다.
```bash
$ cd ios # DevOpsForRN/ios
$ fastlane init # 초기화-
다음과 같이 어느 걸 하고 싶으냐고 나올 텐데 우리는 여러 가지 일들을 manual하고 싶으니 4번을 선택한다.
[13:48:34]: What would you like to use fastlane for? - 📸 Automate screenshots
- 👩✈️ Automate beta distribution to TestFlight
- 🚀 Automate App Store distribution
-
🛠 Manual setup - manually setup your project to automate $ 4
명령어를 치고나면
DevOpsForRN/ios/fastlane/Appfile-> 프로젝트나 account config(appidentifier, appleid)DevOpsForRN/ios/fastlane/Fastfile-> 실제 돌릴 명령어들을 정의DevOpsForRN /ios/fastlane/Readme-> 설명서, lane을 추가할때 자동으로 변경됨DevOpsForRN /ios/fastlane/report.xml-> fastlane 명령어를 돌릴때마다 변경되는 report 문서
실제로는
Appfile은 정해진 계정, bundle identifier등을 맨 처음 한번만 정의하면 되고Fastfile의 경우는 lane(작업들의 집합)을 정의할 때만 수정하면 된다. 다음 빌드로 넘어가기 전에, 한 가지를 짚고 가야 한다. IOS 에서는 Code Signing이라는 개념이 굉장히 중요하다. Code Signing을 하지 않으면 Beta testing service에 올리거나, App Store에 Deploy 할 수 없다.Fastlane에는 3가지 signing 방법이 있다.
Fastlane의 3가지 Signing
- Match -> private key와 certificates를
git에 암호화하여 보관하고, 이를 가지고 signing하는 방법 - Cert and Sigh -> private key와 certificates를
local에서 가지고 있고, 이를 signing하는 방법 - Manual -> Apple Developer Portal에서
.p12,.cer,. mobileprovision을 직접 signing 하는 방법
1번 방법(Match)이 암호화된 인증서를 git에 올리는 게 다소 이상할 수 있지만 이 방식은 생각보다 안전하고, **새로운 팀 멤버가 들어올 경우 아니면 새로운 개발 장비를 세팅 할때도 쉽고 간편하므로 1번 방법으로 선택했다.
Code Signing에 대하여 더 자세히 이해하고 싶다면 Code Signing Guide for Teams 문서를 참조하자.
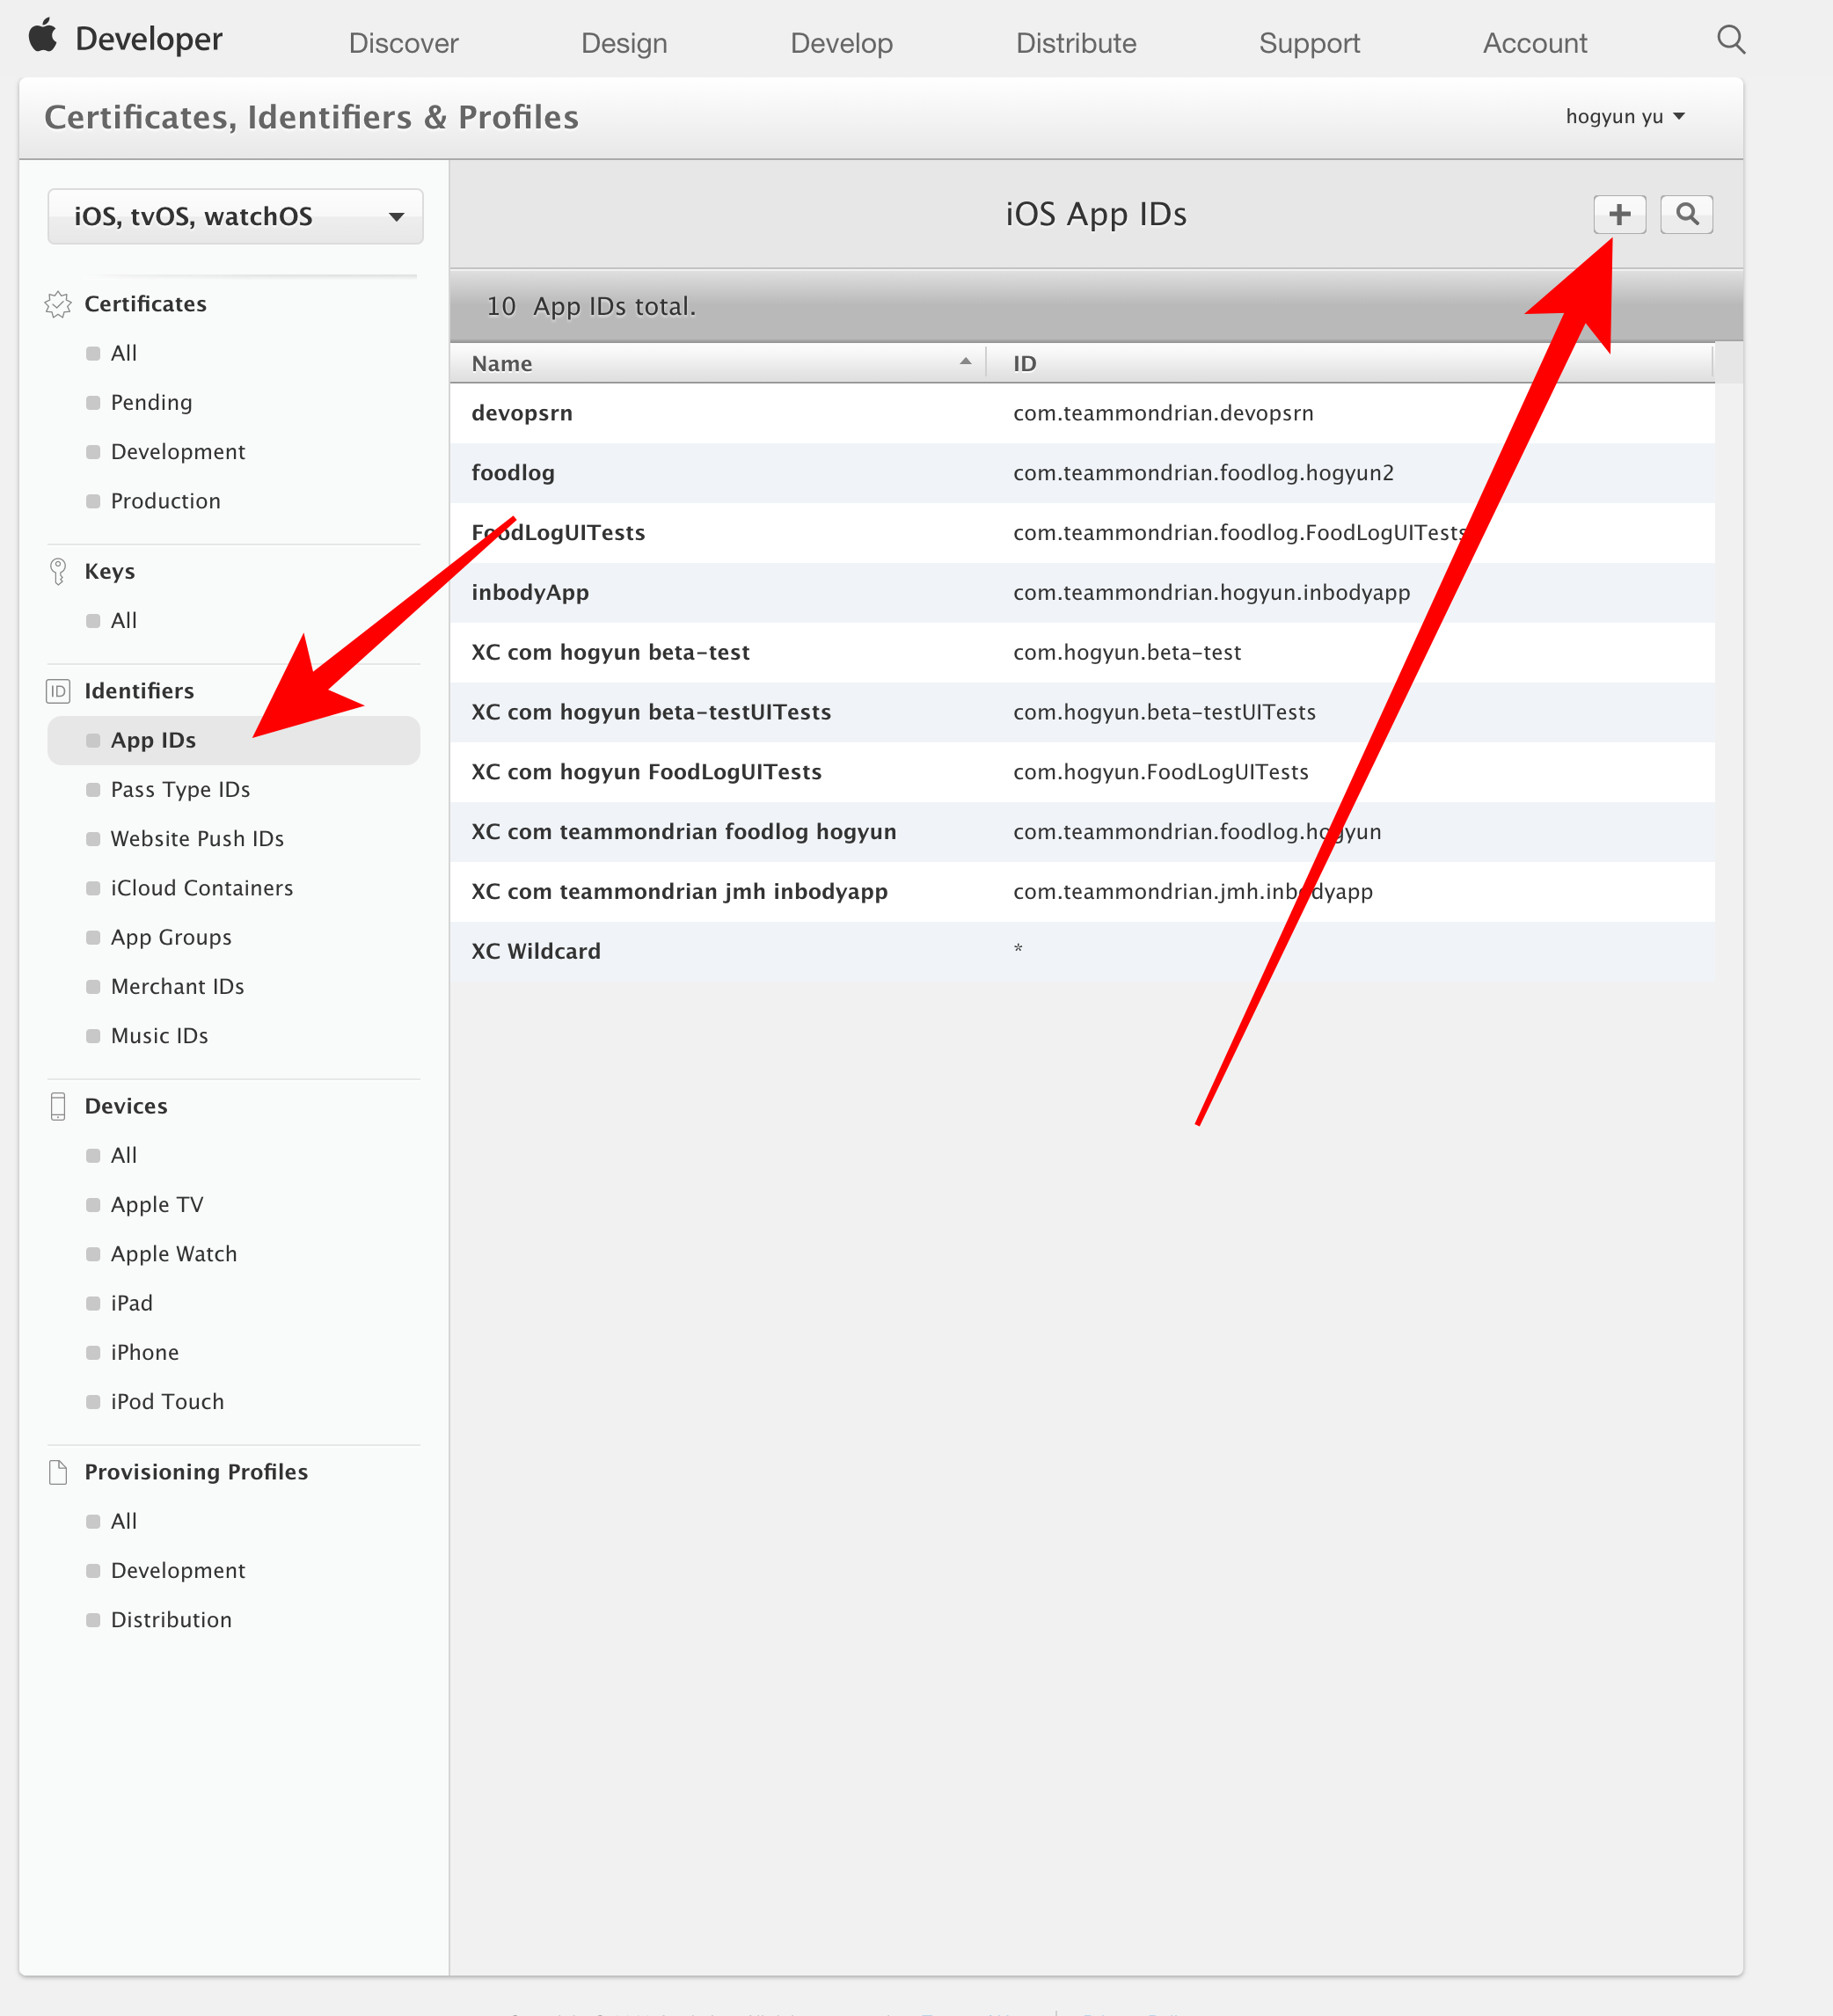
Apple Developer Portal에서 Bundle Identifier 생성
- Apple Developer Portal 에서 bundle identifier를 만든다
- 좌측 탭에서 Identifiers -> App IDs
- 우측 상단에 + 버튼 클릭
- 앱 이름을 입력
com.teammondrian.devopsrn와 같은 당신이 만들 identifier 입력- Done을 클릭
Fastlane 설정 파일 수정
다음은 match - fastlane docs 을 따라 하는 내용과 동일하다
- 첫번째로 private key와 certificate를 담을 Github Repository를 새로 하나 생성한다.
-
주의할 점이 하나 있는데 민감한 정보를 담기 때문에 Private Repository 로 만들어야 한다.
# DevOpsForRN/ios 폴더에서 진행한다. $ fastlane match init # 명령어를 입력하고, 방금전 만든 github-repo주소를 넣는다. $ fastlane match appstore # 애플 아이디와 비밀번호를 묻는다. # 이전에 만든 `com.teammondrian.devopsrn` 와 같은 identifier를 입력한다 # passphrase -> 파일들을 암호화할 비밀번호를 입력한다. (자기가 만들 비밀번호) - 그러면
DevOpsForRN/ios/fastlane/Matchfile이 만들어 지는데, 다음과 동일하도록 수정한다. type "development"를type "appstore"로 수정한다.app_identifier ["com.teammondrian.devopsrn"]에서com.teammondrian.devopsrn를 당신의 Bundle Identifier로 변경한 후 추가한다.-
username "yoohoogun114@naver.com"와 같이 이메일을 당신의 Apple ID로 변경후 추가한다.git_url "https://github.com/philographer/create-react-bootstrap-match.git" # 당신이 생성한 git repo의 주소를 입력
type “appstore” # 기본값은 development이지만, appstore로 수정한다. appstore, adhoc, enterprise or development가 될 수 있다.
app_identifier [“com.teammondrian.devopsrn”] # 당신이 생성한 bundle identifier 입력 username “yoohoogun114@naver.com” # 당신의 apple id로 수정
For all available options run fastlane match --help
Remove the # in the beginning of the line to enable the other options
- `DevOpsForRN/ios/fastlane/Fastfile` 도 파일이 다음과 동일하도록 수정한다.
- 아래 부분에서, `"com.teammondrian.devopsrn”` 로 되어 있는 부분을 당신의 **Bundle Identifier**로 변경한다.
```ruby
# This file contains the fastlane.tools configuration
# You can find the documentation at https://docs.fastlane.tools
#
# For a list of all available actions, check out
#
#     https://docs.fastlane.tools/actions
#

# Uncomment the line if you want fastlane to automatically update itself
# update_fastlane

default_platform(:ios)

platform :ios do
  desc "Build and run tests"
  lane :test do
    scan(scheme: "DevOpsForRN")
  end

  lane :beta do
    desc "TesfFlight for IOS"
    # Circle CI does not create new code signing certificates or provisioning profiles.
    sync_code_signing(type: "appstore", readonly: true, app_identifier: "com.teammondrian.devopsrn") # Bundle Identifier를 아까 만든 값으로 치환한다.
    # see code signing guide for more information, readonly because of CircleCI
    build_app(scheme: "DevOpsForRN")
    upload_to_testflight(skip_waiting_for_build_processing: true)
    # slack(
    #   slack_url: "https://hooks.slack.com/services/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"
    #   channel: "dev",
    #   message: "Successfully uploaded a fastlane beta release"
    # )
  end
end

lane :increase_build_number_and_push_to_beta do |values|
    # Increment the build number (not the version number)
    # Providing the xcodeproj is optional
    increment_build_number(xcodeproj: "DevOpsForRN.xcodeproj")
    # Commit the version bump
    commit_version_bump(xcodeproj: "DevOpsForRN.xcodeproj", force: true)
    # Add a git tag for this build. This will automatically
    # use an appropriate git tag name
    add_git_tag
    # Push the new commit and tag back to your git remote
    push_to_git_remote(
        remote_branch: "beta", # optional, default is set to local_branch
        force: true,    # optional, default: false
    )
endDevOpsForRN/ios/fastlane/Appfile도 파일이 다음과 동일하도록 수정한다.app_identifier "com.teammondrian.com"에서com.teammondrian.com부분을 당신의 Bundle Identifier 로 변경 후 추가한다.-
apple_id "yoohoogun114@naver.com"와 같이 이메일을 당신의 Apple ID로 변경후 추가한다.app_identifier "com.teammondrian.com" # The bundle identifier of your app apple_id "yoohoogun114@naver.com" # Your Apple email address
For more information about the Appfile, see:
https://docs.fastlane.tools/advanced/#appfile
- IOS의 경우, TestFlight에 올리려면 **Image Assets** 들을 올려야 한다. 테스트 용도이므로, [Free vector icons](https://www.flaticon.com/) 에서 자기가 원하는 이미지를 선택하고

**Use Asset Catalog**를 클릭하고 필요한 Aseets들을 집어넣는다.
작성자는 [Asset Catalog Creator Pro](https://itunes.apple.com/kr/app/asset-catalog-creator-pro/id809625456?mt=12) 를 사용하였지만, 인터넷에서 다른 **Asset Generator**를 사용해도 무관하다.
# Itunse-Connect 앱 등록
- [iTunes Connect](https://itunesconnect.apple.com/login)에 로그인
- 나의 앱 -> + 버튼 -> 신규 앱
- 플랫폼 -> ios 체크
- 나머지 내용들을 채우고, **번들 ID** 는 이전에 Developer Portal에서 만든 **Bundle Identifier**를 선택한다.

# Fastlane on the CircleCI
이제 대망의 `CircleCI`와 `Fastlane`을 연동할 차례이다. 이를 위해서는 [Continuous Integration - fastlane docs](https://docs.fastlane.tools/best-practices/continuous-integration/#circleci-integration) 문서를 따라해보자.
- `DevOpsForRN/ios/fastlane/Fastfile` 경로에 다음과 같이 추가하자.DevOpsForRN/ios/fastlane/Fastfile
… platform :ios do beforeall do setupcircle_ci end
desc "Build and run tests"… end
- `DevOpsForRN/ios/fastlane/Fastfile` 의 완성된 내용은 다음과 같다.This file contains the fastlane.tools configuration
You can find the documentation at https://docs.fastlane.tools
For a list of all available actions, check out
https://docs.fastlane.tools/actions
Uncomment the line if you want fastlane to automatically update itself
update_fastlane
default_platform(:ios)
platform :ios do beforeall do setupcircle_ci end
desc “Build and run tests” lane :test do scan end
lane :beta do desc “TesfFlight for IOS” # Circle CI does not create new code signing certificates or provisioning profiles. synccodesigning(type: “appstore”, readonly: true, appidentifier: “com.teammondrian.devopsrn”) # Bundle Identifier를 아까 만든 값으로 치환한다. # see code signing guide for more information, readonly because of CircleCI buildapp(scheme: “DevOpsForRN”) uploadtotestflight(skipwaitingforbuildprocessing: true) # slack( # slack_url: ”https://hooks.slack.com/services/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” # channel: “dev”, # message: “Successfully uploaded a fastlane beta release” # ) end end
lane :increasebuildnumberandpushtobeta do |values| # Increment the build number (not the version number) # Providing the xcodeproj is optional incrementbuildnumber(xcodeproj: “DevOpsForRN.xcodeproj”) # Commit the version bump commitversionbump(xcodeproj: “DevOpsForRN.xcodeproj”, force: true) # Add a git tag for this build. This will automatically # use an appropriate git tag name addgittag # Push the new commit and tag back to your git remote pushtogitremote( remotebranch: “beta”, # optional, default is set to local_branch force: true, # optional, default: false ) end
- `DevOpsForRN` 폴더 안에 `.circleci`라는 디렉토리를 만든다.
- `DevOpsForRN/.circleci/config.yml` 에는 다음의 내용을 추가하자
.circleci/config.yml
To Validate your config.yml then use this cli.
$ circleci config validate -c .circleci/config.yml
version: 2 jobs: build: workingdirectory: ~/project docker: - image: circleci/node:8 steps: - checkout - run: yarn - run: yarn run test - persisttoworkspace: root: ~/project paths: - nodemodules - storetestresults: path: ~/project/junit.xml
beta-deploy-ios: workingdirectory: ~/project/ios macos: xcode: “9.0” steps: - checkout: path: ~/project - attachworkspace: at: ~/project - run: bundle update fastlane - run: bundle exec fastlane beta
ios: macos: xcode: “9.0” workingdirectory: ~/project/ios environment: FLOUTPUTDIR: ~/project/output shell: /bin/bash —login -o pipefail steps: - checkout: path: ~/project - run: name: Set Ruby Version command: echo “ruby-2.4” > ~/.ruby-version # Not using a workspace here as Node and Yarn versions # differ between the macOS image and the Docker containers above. - run: yarn - run: bundle install —path vendor/bundle - persisttoworkspace: root: ~/project paths: - ios - run: bundle exec fastlane test - storeartifacts: path: ~/project/output - storetestresults: path: ~/project/output/scan
workflows: version: 2 node-android-ios: jobs: - build - ios: requires: - build - beta-deploy-ios: filters: branches: only: - beta requires: - ios
`CircleCI`에서 Code Signing, Fastlane Match를 이용하기 위해서는 다소 많은 **초기 작업**이 필요하다. 다음 문서를 따라 하면 일련의 초기화, key setting 작업을 완료할 수 있다. [Setting Up Code Signing for iOS Projects - CircleCI](https://circleci.com/docs/2.0/ios-codesigning/)

- Github에 프로젝트 모두 올리기
[Github Repository](https://github.com/new)를 새로 하나 생성한다.
```bash
# DevOpsForRN/ 디렉토리에서 진행한다.
$ git init
$ git remote add origin https://github.com/philographer/DevOpsForRN.git # 자신의 repo 주소로 변경하기
$ git add --all
$ git commit -m "first commit"
$ git push -u origin master- CircleCI의 Project를 생성한다.
- CircleCI - Dashboard 접속
- MacOS 빌드는 유료이므로, 무료 플랜을 선택한다.
- 좌측 Settings -> MacOS Plan -> Trial Plan Click
- 좌측 Project 탭 클릭 -> Add Project 클릭
- 방금 만든 Github Repo의 오른쪽에 Setup Project 버튼을 클릭
- OS는 macOS 선택
- Start Build 버튼 선택
- Work-Flow 탭으로 이동되는데, 자세히 보려면 빌드 이름을 누르면 된다.
- 다음과 같이 보이면 성공이다.

- CircleCI의 Project Setting -> Environment Variables -> Add Variable 을 클릭하고, 다음의 환경변수들을 추가한다.
MATCH_PASSWORD: 아까 만든 match pass phrase 입력FASTLANE_USER: Apple ID 입력 (ex.yoohoogun114@naver.com)FASTLANE_PASSWORD: Apple PW 입력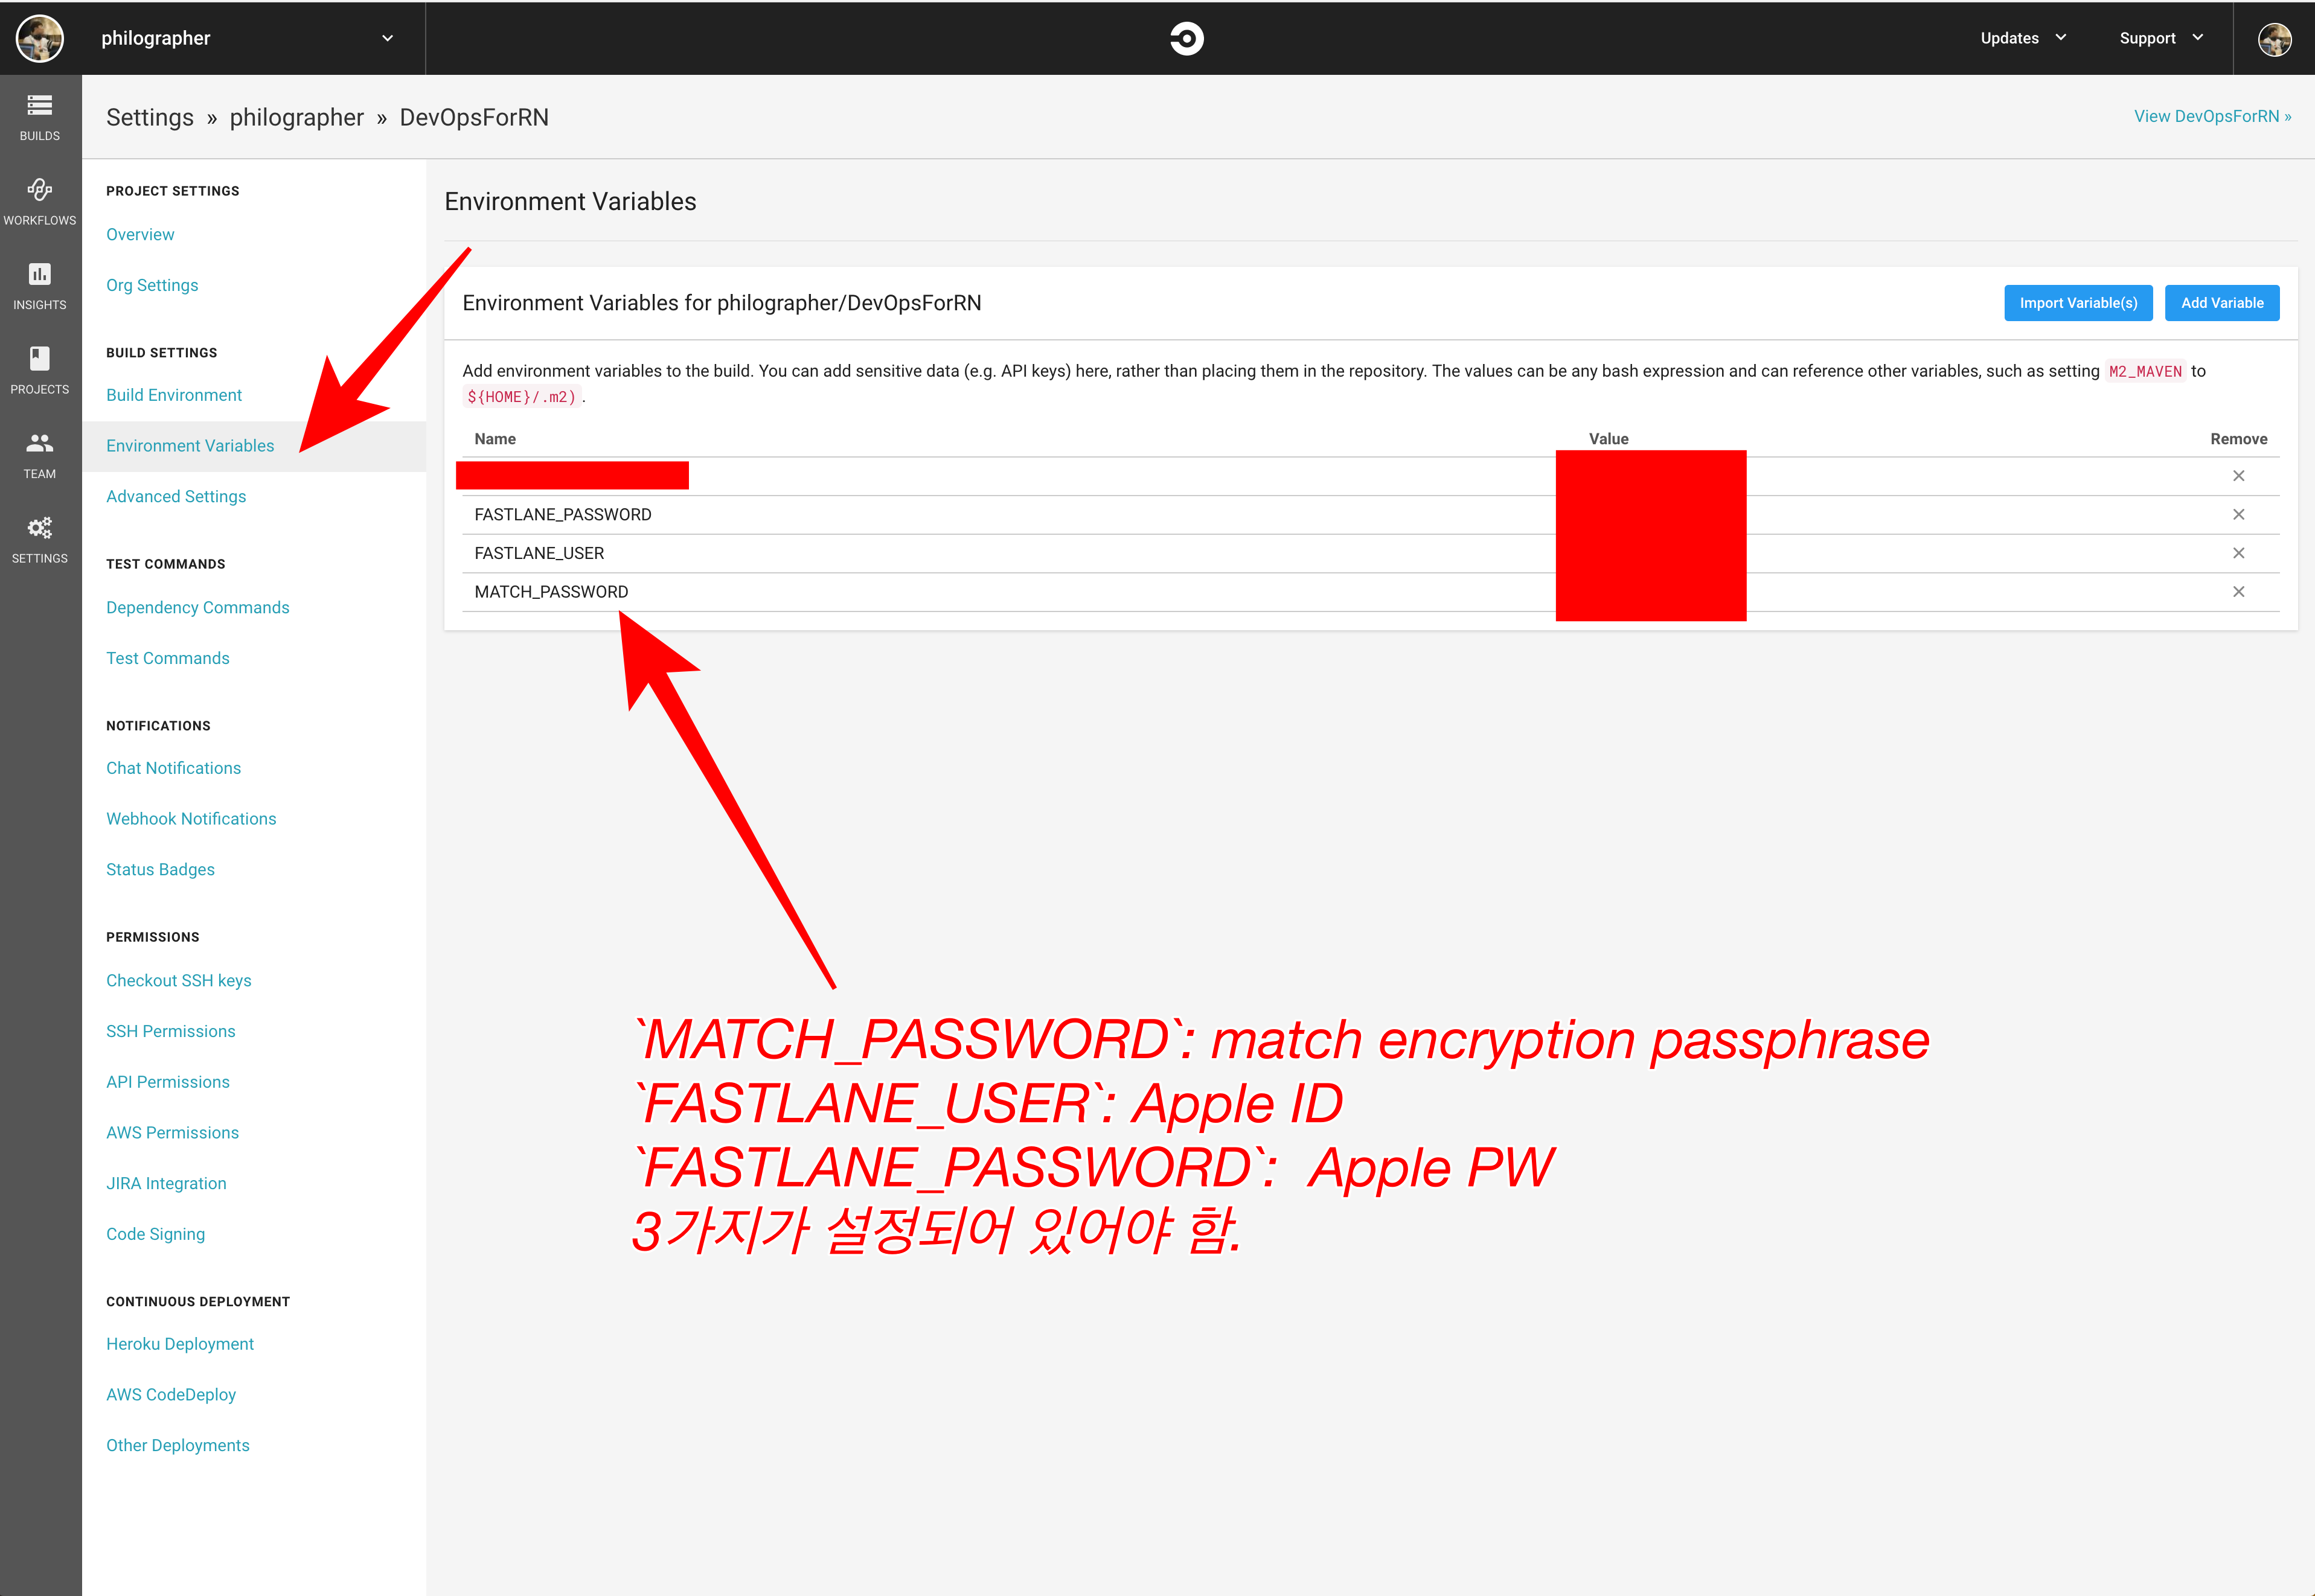
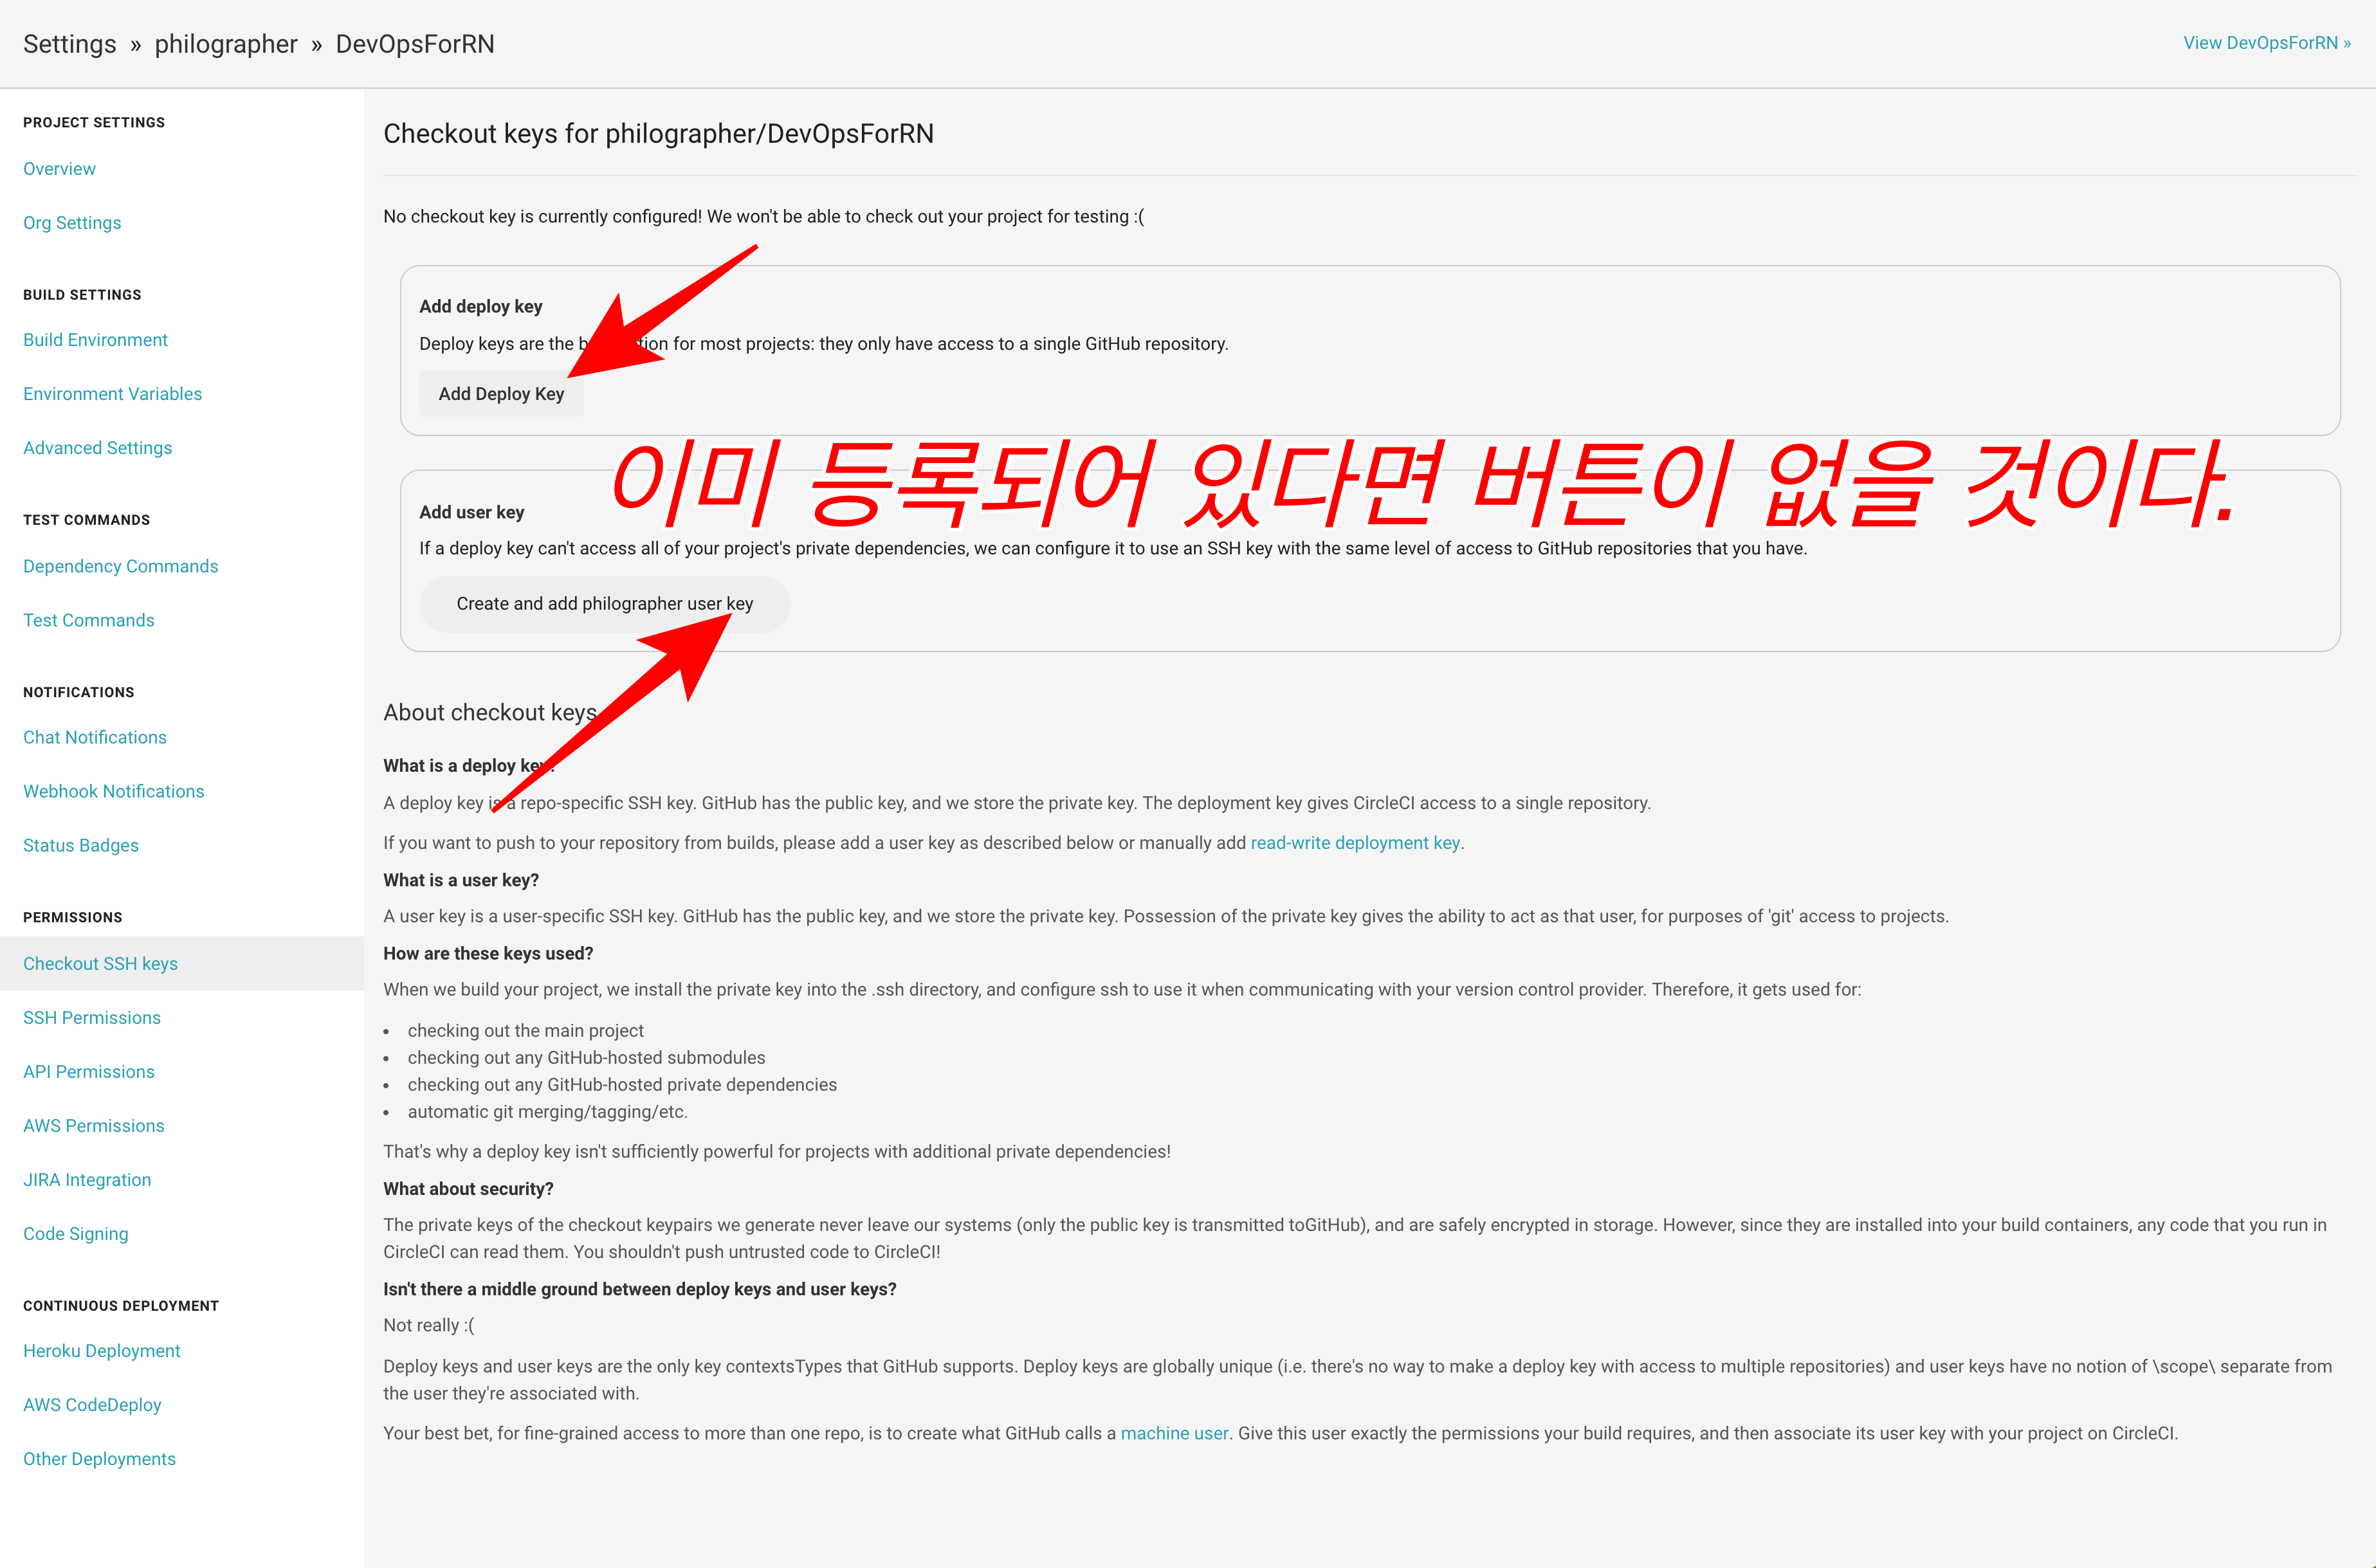
- CircleCI의 Project Setting -> Checkout SSH Keys -> Add Deploy Key 버튼 또는 Create and add … user key 버튼을 클릭한다.
그렇다면 후에 CI에서 debug 해야 할 ssh-key를 자동으로 vm에 미리 넣어준다. 따라서 미리 지정해둔 계정에서는 ci vm에 접근할 수 있다.
Trigger Script 작성
DevOpsForRN/package.json파일을 다음과 같이 수정한다scripts에native-test추가-
scripts에beta추가{ "name": "DevOpsForRN", "version": "0.0.1", "private": true, "scripts": { "start": "node node_modules/react-native/local-cli/cli.js start", "test": "jest", "native-test": "tools/run_native_test.sh", # 추가 "beta": "tools/run_beta_deploy.sh", # 변경 }, "dependencies": { "react": "16.2.0", "react-native": "0.52.1", "react-native-fabric": "^0.5.1" }, "devDependencies": { "babel-jest": "22.1.0", "babel-preset-react-native": "4.0.0", "jest": "22.1.4", "react-test-renderer": "16.2.0" }, "jest": { "preset": "react-native" } } - Shell Script 작성하기
DevOpsForRN/tools디렉토리를 생성한다-
DevOpsForRN/tools/run_beta_deploy.sh파일을 생성하고, 다음의 내용을 작성한다.#!/usr/bin/env bash
cd ios fastlane increasebuildnumberandpushtobeta
- `DevOpsForRN/tools/run_native_test.sh` 파일을 생성하고, 다음의 내용을 작성한다.
```bash
#!/usr/bin/env bash

cd ios
fastlane test-
작성한 후, 권한을 부여한다
$ chmod +x run_beta_deploy.sh
$ chmod +x run_beta_deploy.sh
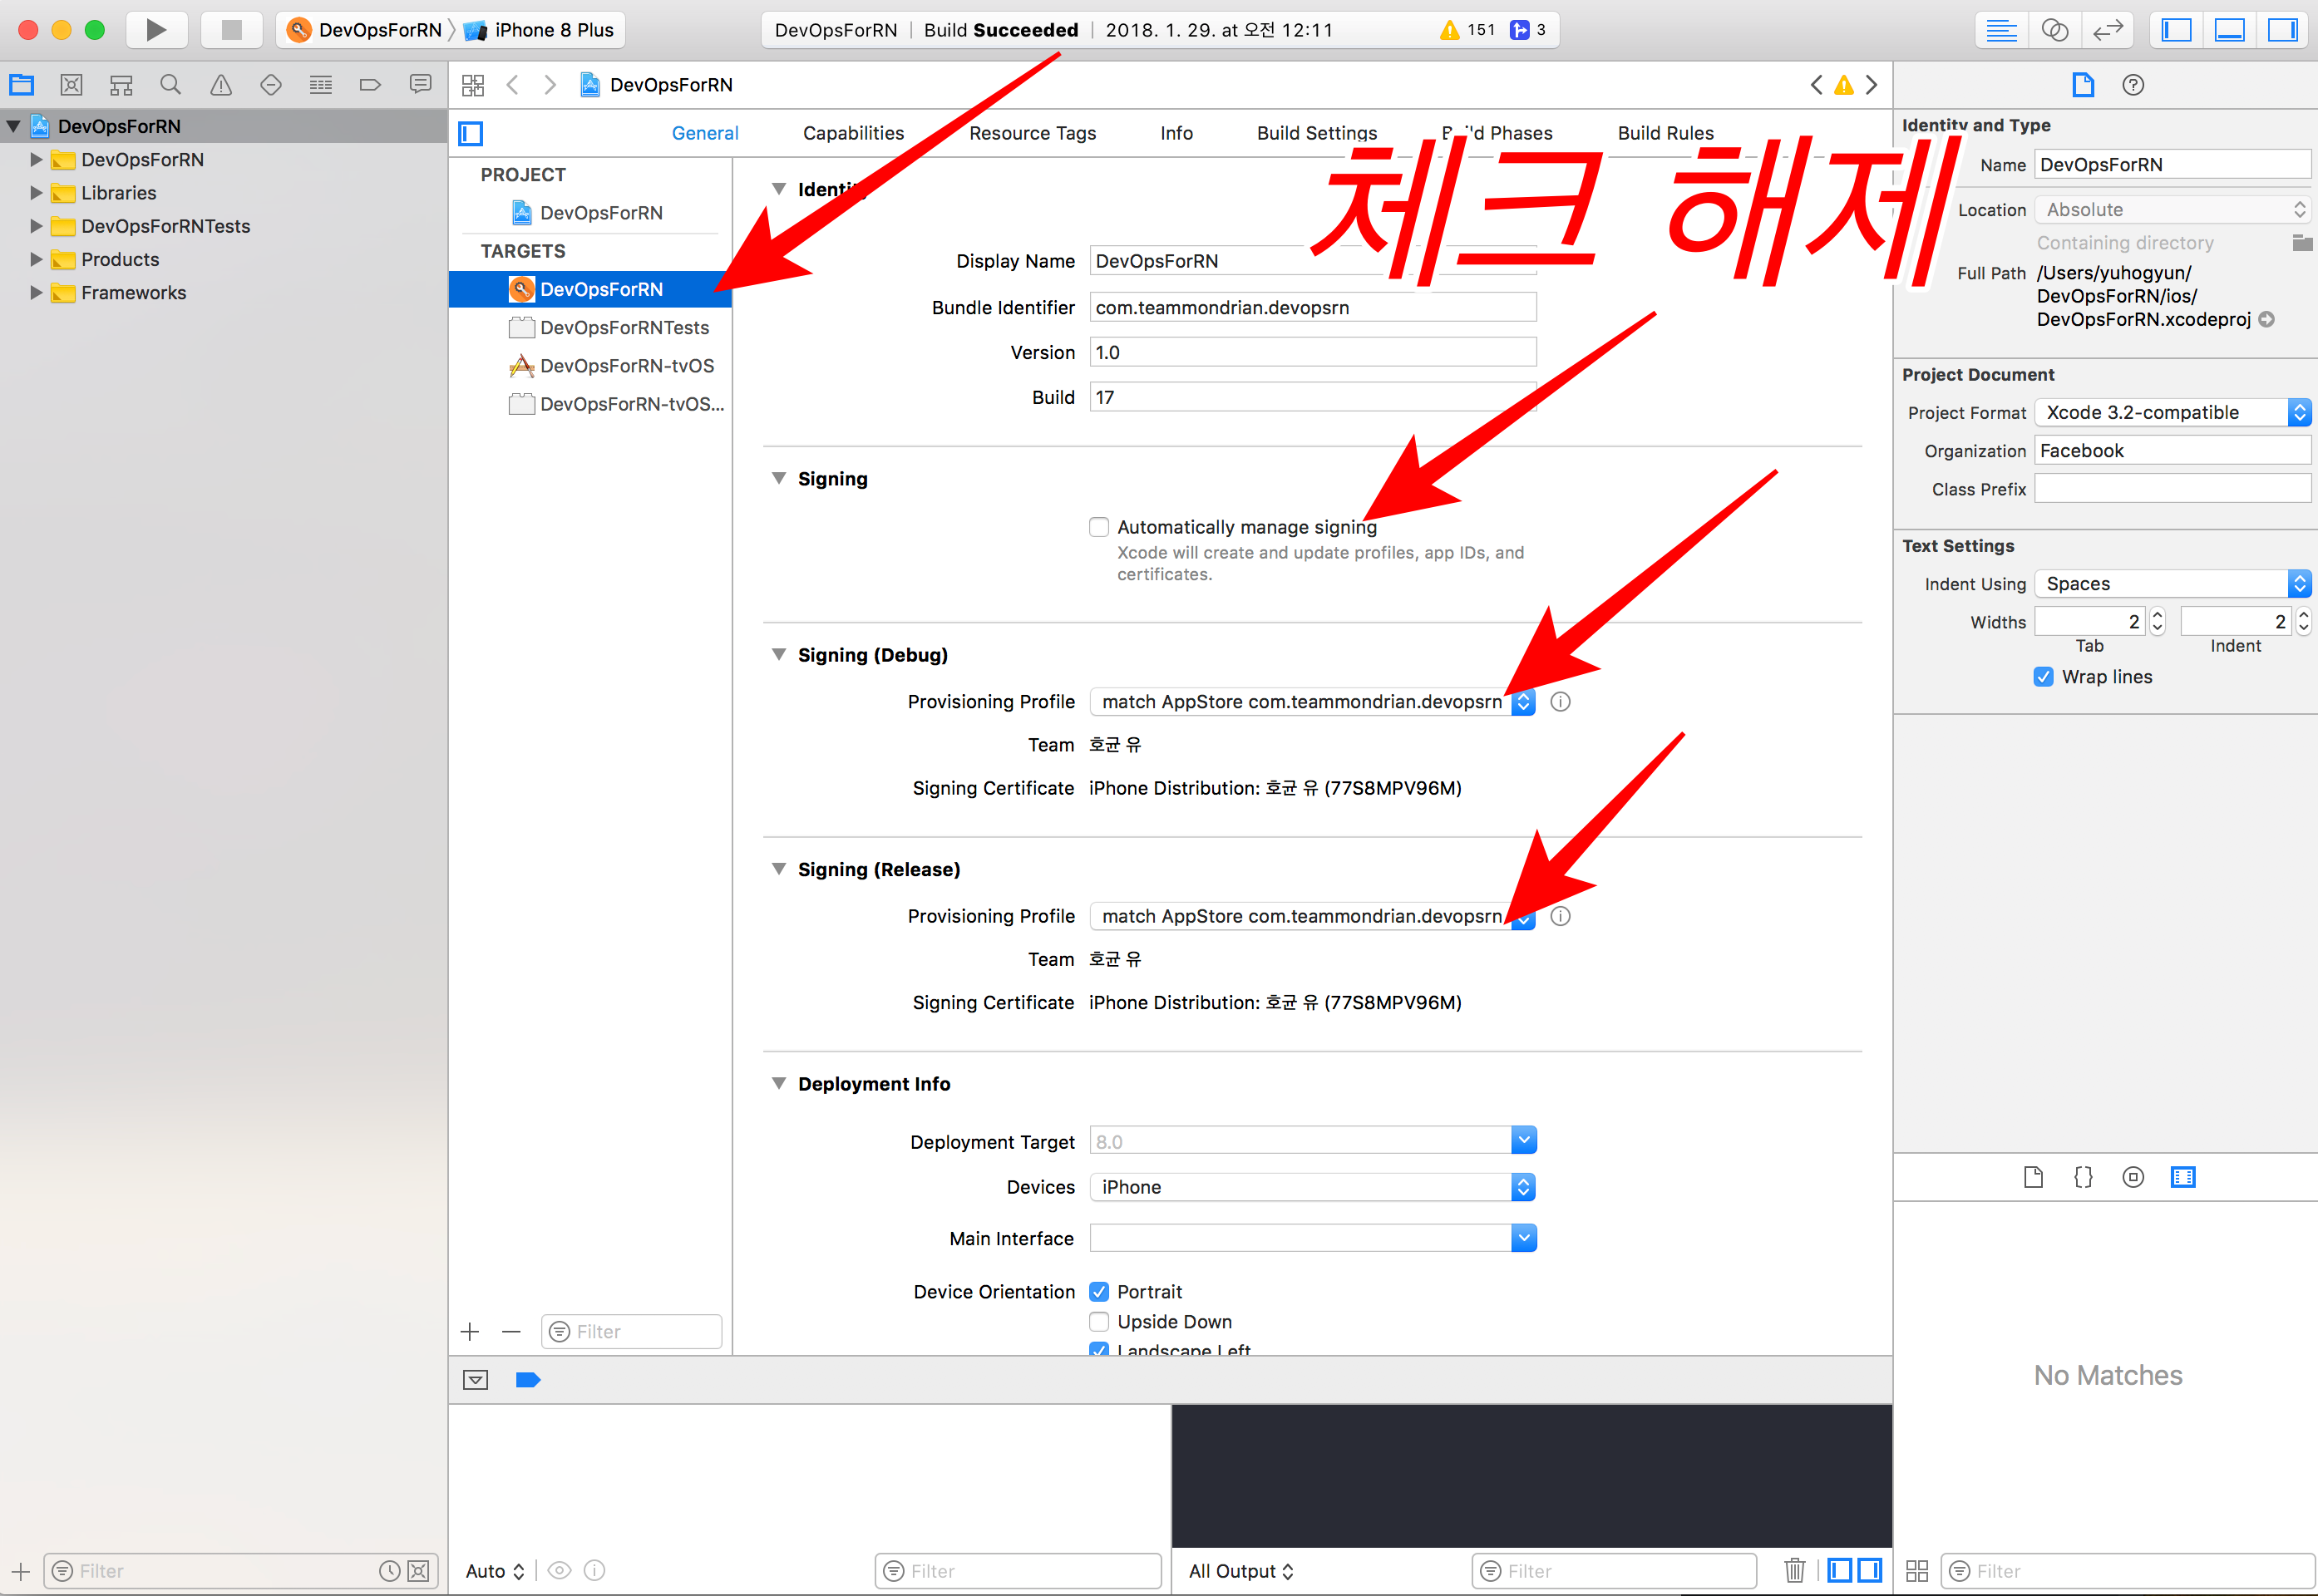
Xcode Signing 설정
- fastlane에서 사용할 인증서를 선택한다.
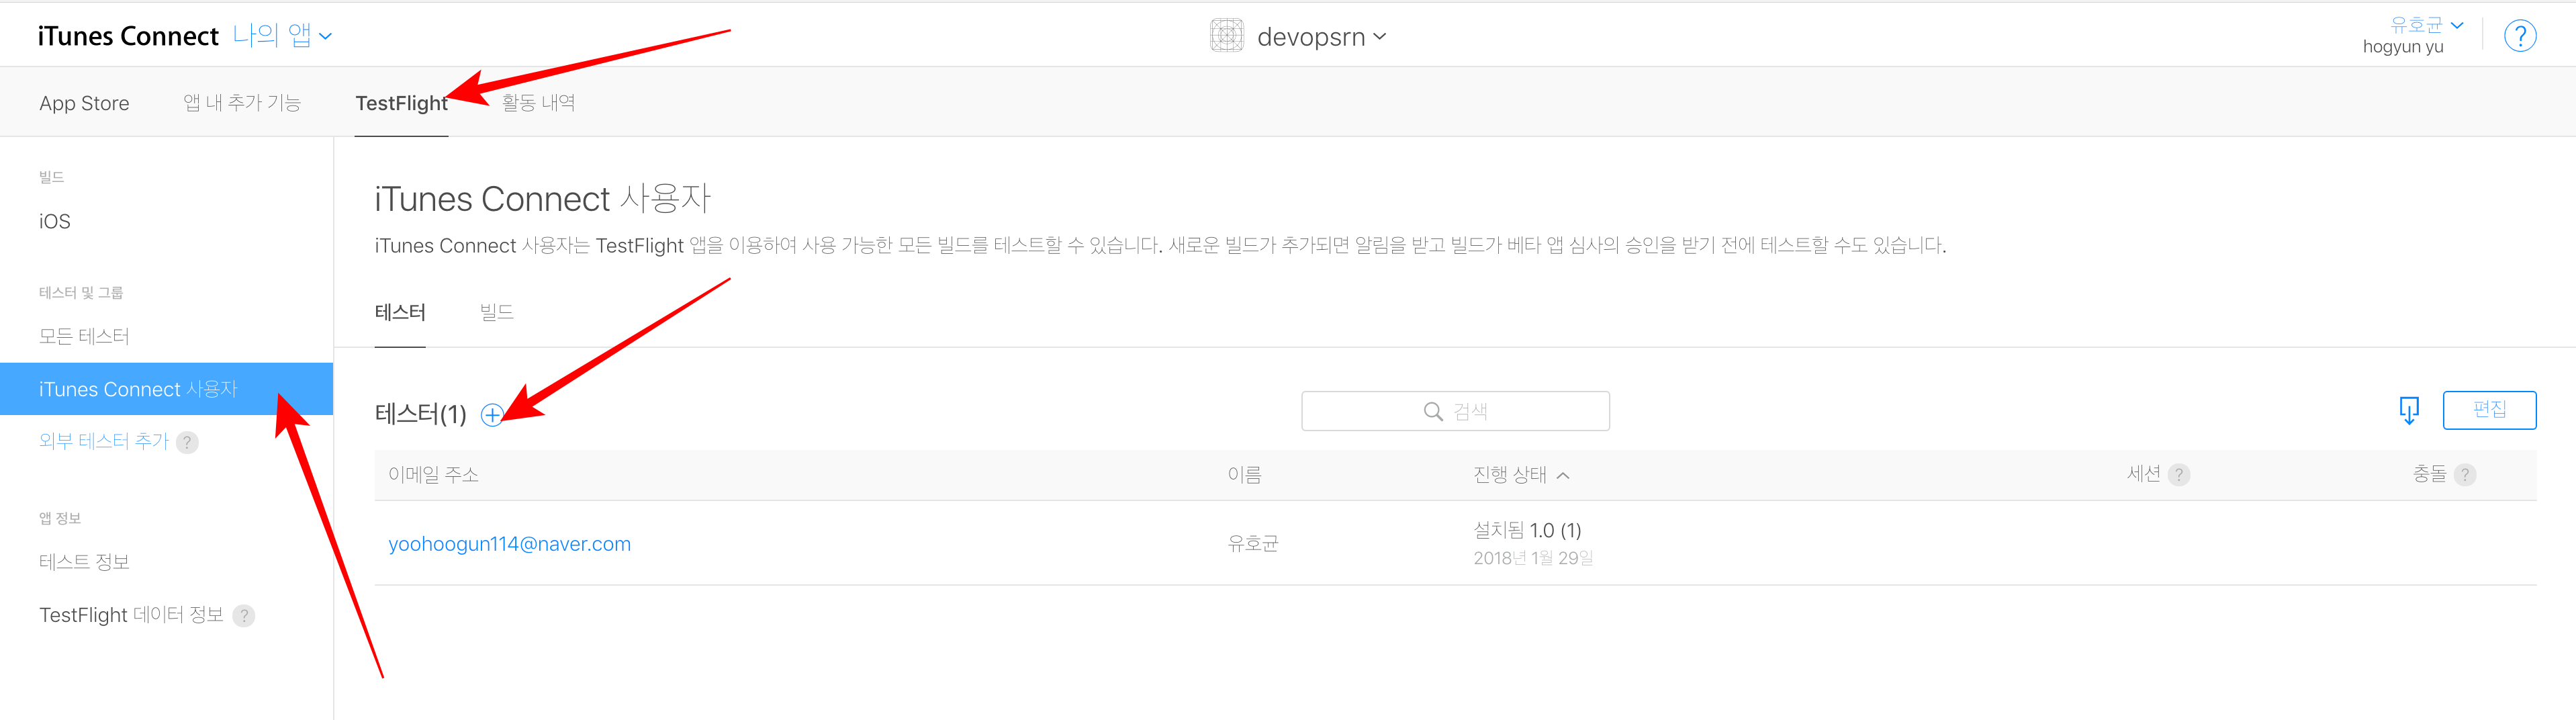
TestFlight에 사용자 초대
- iTunes Connect 에 접속
- 나의 앱 -> 자신이 이전에 만들었던 앱 클릭
- TestFlight 탭 클릭
- 테스터 및 그룹 -> Itunes Connect 사용자 클릭
-
- 버튼 누르고, 사용자 초대
- 초대한 사용자의 이메일에서 초대 수락
암호화
- 앱 내 추가 기능
- 암호화 탭의 지침에 따른다.

작성한 내용 검증하기
다음의 스크립트를 실행했을 때, Circle CI에서 work-flow가 올바르게 실행되나 지켜본다.
# DevOps/ 디렉토리에서
$ npm run beta- CircleCI Dashboard 접속
- 다음과 같이 JS Test -> IOS Native Test -> TestFlight Deploy가 성공했는지 확인

Next
- Fastlane, CircleCI를 이용하여 React Native DevOps 도입기 (3)
- Fastlane, CircleCI를 이용하여 React Native DevOps 도입기 (4)
Reference
match is-this-secure? - fastlane docs GitHub - CircleCI-Public/circleci-demo-react-native: A demo React Native project that’s building on CircleCI 2.0 with Workflows. fastlane for React Native iOS & Android app DevOps – React Native Training – Medium circleci-demo-workflows/config.yml at workspace-forwarding · CircleCI-Public/circleci-demo-workflows · GitHub
